Docker Compose for absolute beginners — how does it work and how to use it (+ examples)
Defining and running multi-container Docker applications


In part 1: the basics of Docker we’ve focussed on building a Docker image. Creating a container from that image was pretty easy, executing a single command. Docker-compose automates this further. In this article we are going to create a file that contains the run-configuration for multiple containers. Then, we can then build all images and run all containers with a single command!
We’re going to explore compose with the help of a detailed example for a multi-container application. We’re going to spin up multiple, interconnected containers. You can use this walkthrough as a guide for your own projects. At the end of this article you’re able to:
- Understand what Docker Compose is and how it works
- See what advantages Docker Compose adds to Docker to make your life easier
- Understand when to use Docker Compose
- Are able to use Compose to spin up and manage multiple containers
- Are able to brag about automating a lot of your infrastructure
In this article we’ve explored the very basics of Docker; it’s recommended to read it first if you are unfamiliar with Docker. It details how to create Docker images and how and when to use these images.
First, we’re going to look at the advantages of Compose; why do we need this tool and what does it offer us? Then we’ll have a real-code example that’ll show you how to use Compose.
1. Why use docker compose?
In this part, we’re going to go through the main reasons to use Compose.
All of your configuration in one file
Compose revolves around a config file called docker-compose.yml. In it we define all of our services. Think of a service as a part of your application; a database or API for example. All of our services rely on an image with which we create a container. Spinning up a container can have many options; how these options are configured will be stored in the yml file.
An example of these run options is the port mapping that we’ve define in part 1. We had to call docker run —publish 5000:5000 python-docker in our terminal. Compose allows us to define these options in a file. We’ll see an example of this later.

Another benefit of having all of our services with all their corresponding build options in one file is that we can build and run all of our services at once calling docker-compose up!
Using environment variables
Running our containers can be made more flexible with environment variables. We can provide the docker-compose up command with a file that contains some environment variables. This way we can securely provide passwords without hardcoding these into the config file.
An example: we’ll create a file called .env that has DBPASSWORD=secretpass. We can then use DBPASSWORD as a variable in the docker-compose.yml.
In order to do so we specify our env file in calling docker-compose: docker-compose --env-file .env up. This keeps our passwords out of our repositories and docker-compose.yml. Also it offers more flexibility and a neater project since our passwords aren’t hardcoded anymore.
Shared container network
When we spin up our containers with Compose, it defines a network that all our services share. This means that all services can communicate internally.
Let’s illustrate this with an example. Imagine we hosted our application on beersnob.com. When our API needs to communicate with our database it doesn’t need to connect via beersnob.com:5432 but can instead just call the database internally. This is great for security because it means that only our services have access to our database, clients cannot reach the service from outside the application.
Portability and version control
Since we have all of our config in one file we can easily share this file via a version control system like Git. Users can just pull the docker-compose.yml and source code and they have all containers running! An extra benefit is that we keep an entire history of all changes that we make to our configuration so that we can restore a previous version whenever we want. This also makes it easier to set up a CI/CD pipeline for this application, which we’ll get into in a future part.
Flexibility
Since all of our services are completely isolated from one another we can easily add a new service. Maybe in the future our app needs some caching → just spin up a Redis container! Other services like our API can the easily connect to the new Redis service over the internal network.
2. How Docker works: creating our first container
Okay, enough talking; let’s see some code! In order to really understand how Compose works and how to use it, we’re going to build a containerized application.
2.1. Goals
We’re creating an application called BeerSnob; a site that’s specially made for drinkers of fine beers. It allows users to share reviews about beers they drank at specific venues; rating both the venue and the beer while providing information about its price and taste.
This application needs a website, an API and a database. In this article we’ve created a database model with migrations and in this article we’ve created an API for this app. Let’s now continue to create the infrastructure in which these services will run.
2.2 Overview
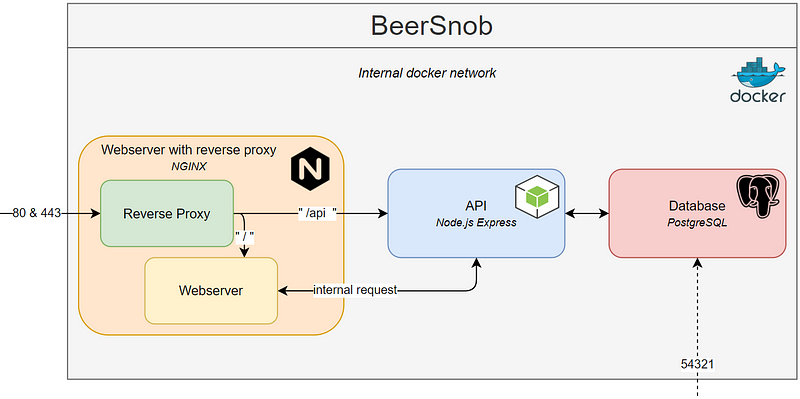
First we’ll check out this beautiful diagram of what we’d like BeerSnob’s architecture to look like:
So what does this all mean? First thing to notice is that we now have multiple, interconnected services running on our single server. This is very impressive on it’s own but it gets better. Let’s walk through all of the blocks first:
We’ll start with the big grey block that’s containing all the others. This is the network in which all of our services (the other blocks) live on our server. Notice that there are just two ways to enter our network; via port 80 (http), port 443 (https) and port 54321 to access the database externally. We’ll get into access later
Orange block: this is our webserver and reverse proxy.
The webserver holds our website-files and makes them available to the world via http and https; the default ports.
The reverse proxy is responsible for passing through requests. We catch beersnob.com/api for example and pass every request to the API service in the blue block, other requests go to the webserver.
Blue block: our API is responsible for communication between our webserver and the database. Notice that our webserver can perform requests internally; it doesn’t have to call beersnob.com/api/users for example, it can just call the API container directly with apicontainer/users. This offers flexibility and security.
Red block: our database that holds all of our data. Notice two things: there is no connection between our webserver and our database; this is all handled via our API. The second thing is that we can access our database from outside the network. This way we can connect to our database in our database management system (PgAdmin e.g.) and work with the data in our database, export it, import data or make stored procedures for example.
Check out this article for a great, practical example on how to containerize a Postgres database.

3. Creating the docker-compose.yml
We’re going to define all of our servcies and connections in the docker-compose.yml. Check it out below.
In these mere 50 odd lines of code, Docker orchestrates all containers for our entire application. I can imagine, though, that if you’re unfamiliar with Compose it can seem a little bit confusing so let’s walk through the lines. You’ll see that three services are defined; a database, API and webserver. Let’s go through it one by one.
3.1 Database
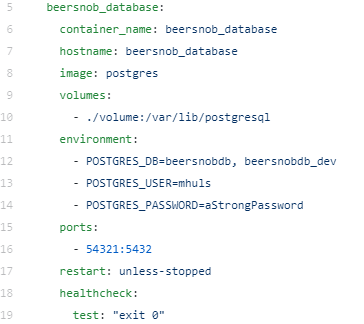
Check out the configuration of our database container.

container_name: the name we’ll give to our container. Otherwise a random name will be generated
hostname: our container will be accessible on the internal network by this hostname. See this as a sort of domain name (http://beersnob_database)
image: The software that’s going to get installed in the container. In this case it’s the default Postgres image.
volumes: volumes are a way to persist data. When we run this image Postgres gets built in the container. We can then put some data in it. If we remove our container our data is gone as well. Volumes allow us to copy the data in our container to our host. Volumes can also be shared by multiple containers. We can also put our source code in volumes so that when we edit the code on our host, the change gets reflected in the container.
environment: These are settings for the container. Here we provide two database names, a user and a password so that Postgres can setup our first databases and our first user
ports: by default we cannot reach the database in our container. With this port mapping we can patch through access to the database. If we go to localhost:54321 then the host (where Docker runs) puts the connection through to the network within the container to port 5432; which is where our database runs.
restart: What happens if our container crashes? We chose ‘unless-stopped’ but we can also ‘always’ restart, don’t restart (‘no’) and restart ‘on-failure’.
3.2 API
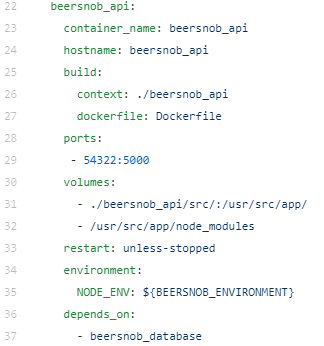
We’ll now go through all configurations for our API, skipping the parts we’ve already covered in the database.

build: In the database we could just pass an image but when it comes to our API we have to do a little extra work. We refer to a folder called “beersnob_api” with the context that contains a dockerfile. In this dockerfile we pull a Node-image, install our dependencies and copy our source code into the container.
volumes: You see here that we mirror our source code (in ./beersnob_api/src) into the container. If we change anything in our source code in the host, the change is reflected in the container once we re-run it.
environment: Our source-code in node needs to be called with an environment variable (either ‘development’ or ‘production’). This is done with an env-file. More on this in a later part of this article.
depends_on: start this API-container once the database is up and running.
3.3 Webserver
The webserver will hold the source code for our website (via volumes). Also notice that we map 2 ports in this container: 80 and 443 (http and https).
3.4 The internal container network
Notice that our containerized app now has its own internal network that our services can use to communicate with each other. Imagine we host our app on beersnob.com. Our website doesn’t have to call http://beersnob.com/api/users to request user information from the database, instead it can just use the internal hostname of the API (http://beersnob_api/api/users).

4. Env files
Remember the environment files from earlier in this article? Check out line 33 in the docker-compose.yml; it says NODE_ENV=${BEERSNOB_ENVIRONMENT}. This means that we have to provide the BEERSNOB_ENVIRONMENT variable with an env file.
5. Spinning up our containers
Let’s spin up our containers! Don’t worry about copying the compose file or not having all data; check out this link where you can clone the repository and spin up the containers on your machine.
Navigate to the folder that contains the docker-compose.yml and call docker-compose --env-file ./config/.env_dev up. That’s it! This command supplied environment variables, copied our source code, installed our dependencies, created all images and finally spun up our network and containers. Let’s test it out!
- Go to
localhost:54322/api/testto test the API. - Go to localhost or
localhost:80to test the webserver - Use a database management system (like PgAdmin) to connect to our database on
localhost:54321with the credentials from the docker-compose.yml (line 12–14)

Conclusion
As we have seen Compose adds a lot of automation, flexibility and standardization. Personally, I think it’s amazing to work with infrastructure in such an automated way. We keep our services decoupled, our source code isolated and our infrastructure version controlled. Hopefully this article helps you a bit with containerizing your application.
Docker offers a lot more features though. Stay tuned for the next parts in which we’ll cover implementing CI/CD in containerized applications, implementing Docker Swarm and more of the many features that Docker offers. Follow me to stay posted!
I hope this article was clear but if you have suggestions/clarifications please comment so I can make improvements. In the meantime, check out my other articles on all kinds of programming-related topics like these:
- Docker for absolute beginners
- Turn Your Code into a Real Program: Packaging, Running and Distributing Scripts using Docker
- Why Python is slow and how to speed it up
- Advanced multi-tasking in Python: applying and benchmarking threadpools and processpools
- Write you own C extension to speed up Python x100
- Getting started with Cython: how to perform >1.7 billion calculations per second in Python
- Create a fast auto-documented, maintainable and easy-to-use Python API in 5 lines of code with FastAPI
Happy coding!— Mike
P.s: like what I’m doing? Follow me!


