Getting started with Postgres in Docker
Creating a Postgres database in a Docker container for beginners

In this article we’ll spin up a Docker container with a pre-defined user and database. First we’ll create an .env file that’ll contain our database credentials. Then we’ll use this to spin up the container. In the last part I’ll show you how to connect to the database.
At the end of this article you’ll be able to connect to a pre-defined database that runs in a docker container. First we’ll set up some things for creating our database and then we’ll go through the steps that are required to run the container. Let’s code!
Setup
First we’ll create an environment file; a file that contains all of our confidential environment variables like our database credentials. We can “inject” all variables from this file into the Docker container upon running it (more information in this article).
Let’s first create our environment file that’ll contain our database credentials. We’ll call the file dbcredentials.env and add the following content:POSTGRES_HOST=my_db
POSTGRES_USER=mike
POSTGRES_PASSWORD=supersecretpassword
POSTGRES_DB=my_project_db
In the next part we’ll use Docker-Compose to spin up our container. If you want to read more about Docker or Docker-Compose check out this or this article.

Spinning up our container
With Docker Compose we specify how to spin up an image. In the parts below we check out the docker-compose.yml files that spin up our database containers. They all have in common that they use the Postgres docker image.
You can set three environment variables spinning up Postgres’ Docker image: the username, password and database name. In the parts below we pass the variables in the env file in multiple ways. The implementation is a bit different but they yield exactly the same results. More information in this article.
1. Passing an env file
We’ll start with passing the entire .env file.
For this article the magic happens in line 12 and 13. Here we pass the path to our env file, relative to the location of the compose file we’re currently editing. Since our dbcredentials.env is in the same directory we can just specify the file name + extension.
Check out if everything is correct with docker-compose config.
Then we can spin up our container with docker-compose up -d.
2. Passing some keys from our .env
In the previous part we pass every variable in our env file to our Postgres container but let not pass every environment. The implementation below only passes the required variables and makes the docker-compose.yml file a little bit more clear and explicit.
As you can read in this article we use docker-compose variables that get filled in by passing a reference to our .env file when we use docker-compose. The changes to our compose file are small:
As you see the only thing that has changed is that we explicitly define our environment variables (line 12 to 15). The other thing that’s different is that we have to execute the compose file while passing a reference to the .env file:
Check out config: docker-compose --env-file dbcredentials.env config
Spin up: docker-compose --env-file dbcredentials.env up -d

Connecting to our newly created database
This too can be done in three ways that we’ll check out below.

1. Command line
Check out this article if you are unfamiliar with using the command line. First we’ll access the command line in the running containerdocker-compose exec my_db /bin/bash
Next we can log in to database (notice that all these credentials are located in our .env file:psql --host=my_db --username=mike --dbname=my_project_db
Next just fill in you password and we are able to execute SQL! Check this out with the following:SELECT NOW();
2. PgAdmin
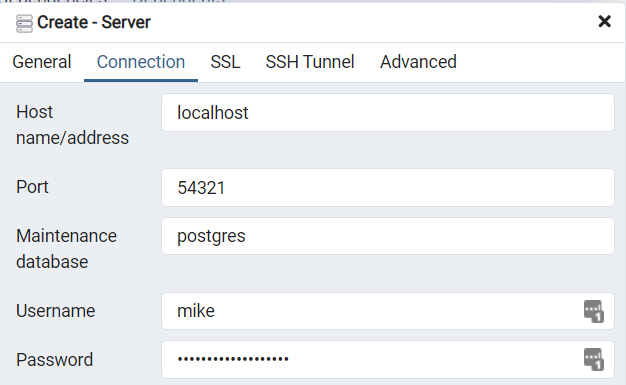
As you see in the docker-compose files above we mapped port 54321 to 5432. This means that we can connect to localhost:54321 to access our database.

Fill in your database credentials from the .env file. Easy!
3. Python database connection
You can use Python to connect to our newly made Postgres database in two simple steps. Check out the article below to create a connection and execute SQL in you Python script:

What’s next?
Now that we have a database up and running we can fill it with data and connect it to other applications.
Use a migration tool:
Check out the article below for a version-controlled migration tool in Python that will allow you to easily standardize, migrate and alter your database structure.

Analyze Postgres statistics
Trace bottlenecks and slow queries.

Optimize
Create superfast database connections by modifying your connection

Write some nice sql
Check out this link for all kinds of useful SQL queries
Conclusion
Spinning up your database is a very important first step. If you have suggestions/clarifications please comment so I can improve this article. In the meantime, check out my other articles on all kinds of programming-related topics like these:
- Safely test and apply changes to your database: getting started with Alembic
- Dramatically improve your database insert speed with a simple upgrade
- DELETE INTO another table
- UPDATE INTO another table
- Insert, delete and update in ONE statement
- UPDATE SELECT a batch of records
- Inserting into a UNIQUE table
- Understand how indices work to speed up your queries
Happy coding!
— Mike
P.S: like what I’m doing? Follow me!


