Git for absolute beginners: understanding Git with the help of a video game
Get an intuition about how to use git with a classic RPG as an analogy

For beginners Git can be a bit intimidating. There are all these terms (pull, fetch, commit, push, remote, origin), the dreaded merge conflicts, and the ever-present fear of typing in a wrong command and destroying all your code.
The goal of this article is not to list a detailed explanation on how to use the Git commands; there are many article that already do that and there’s the Git docs too. Our goal is to get an intuition for the most important functionalities of Git so that you manage your code the right way.
To do so we’ll go through the most important git commands, show a definition and a command and then explain it using an analogy that almost everyone understands: an RPG video game.
Since this article will list some git commands; check out this article if you’re unfamiliar with using a terminal.
The basics
Let’s first dive into the absolute basics of git: how to set it up, and use the most basic commands.

1. Repository
When you initialize git in the folder that contains your code a (hidden) folder is created called .git. Git tracks and saves the history of all changes made to any of the files in the git project folder in the .git folder. Repositories can exist on you laptop and in a hosted internet environment like GitHub.git init
Game: Think of the repository as a special type of save-file where every action of you character can be stored. Example: lose 5 gold gambling, shoots 1 arrow, puts on iron helmet. It’s a lot like a bank-account: in stead of storing just one number (your balance), each transaction is stored. this way you can always calculate your balance after each transaction. In the next parts we’ll check out which actions get stored.
2. Commit
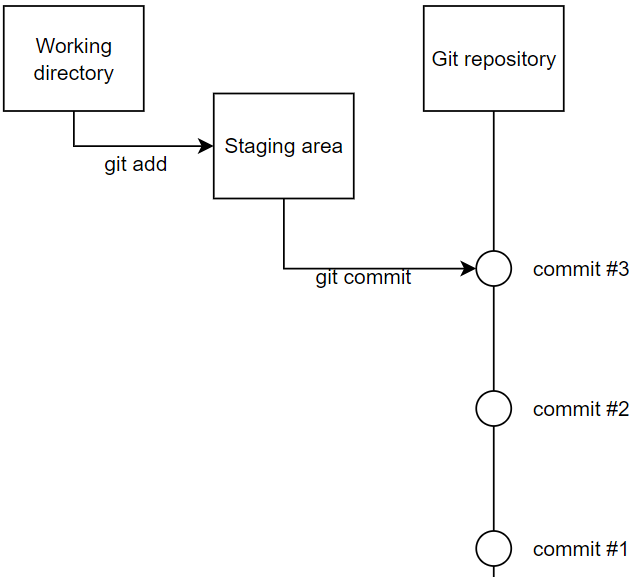
Create a snapshot of the state of your project. Here we take all changes that we’ve made to the code and create an entry in the repository. Add a commit message that gives a summary of the save state.git commit -m "my commit message"
Game: committing code is like writing to a save game. If we perform the 3 actions from the previous part (lose 5 gold gambling, shoots 1 arrow, puts on iron helmet) and then just exit the game then these actions are lost. Once we save them to our save file they are “definitive”. The difference with a game is that we don’t overwrite a save-file; we create a new one that lies on top of the old one. This is how git tracks the history of the code in your project.
3. Add
A git commit command takes all changes from a staging area and commits them. With git add you can pick and choose changes you want to add to the staging area. git add filename1.py filename2.txt or git add .
Game: Imagine that before we save (commit) our game (code) you can choose which actions you want to keep and which ones you don’t want to keep. In our GitGame we can choose which actions we want to include to our save-game. We can git add shoot_1_arrow put_on_helmet, ignoring the lose 5 gold gambling. We add these actions to a waiting-area and then use git commit to take all actions from this waiting area and comimt them to our save file
4. Status
The status shows you the state of your project: which files are new, which are already added and which ones are already committed.git status
Game: Like the stats-menu. You would see statistics compared to the last time you saved (collected 55 gold, walked 15km). In addition it would show you which of these actions you are willing to save to the next save file (which are added).

Branching off
With branches you (or others) can safely add new features to your code and merge them back into “the main game”.

5. Branch
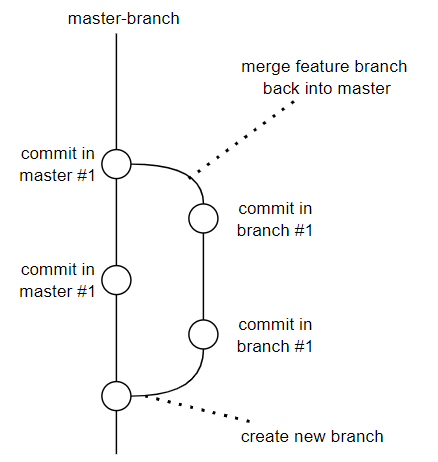
A branch is a line of development that you split off from the main line. The command below creates a new branch and automatically switches to that branch: git checkout -b mynewbranch
Game: In your game there is one side-quest you just keep trying but cannot finish. The solution is to use an USB-stick to give your save-file to your friend so that he can finish the quest. Meanwhile you continue on the main quest. Your friend now ‘works’ on a new branch of your save-file!
6. Merge
When you merge you bring the contents of another branch into the current branch. git merge somebranch
Game: In the previous example you branched of your save-file so that your friend can complete that difficult side-quest for you. Now he visits you and brings the USB that contains his “branch” of the save-file. When we merge our save-files get combined into one so that our save-file now “contains” new completed side-mission. Conflicts can arise though..
7. Merge conflicts
Sometimes, when you merge two files, two changes conflict. We cannot merge; which change is correct?
Game: Merging the save-files from the previous example can result in a conflict. When your character is wearing a blue helmet but the character from your friend’s save-file wears a red one; which one is it going to be? We’d have to resolve the merge conflict by manually choosing. IDE’s help a great deal with this process.

Introducing multiplayer
In the previous part we’ve started collaborating on a project but using USB-sticks is not the way to go. In this part we’ll check out how Git makes it easy to collaborate on code in teams while keeping your code very accessible and add versioning.
Game: In this part we’ll learn about many things. The game-analogy is like this: You put your save-file on a website (remote). Four of your friends download (clone) this save-file and each complete a mission (in a new branch). They upload (push) their individual save-files. Then we merge them all together on the website (pull request).
8. Remote
Remote: A common repository that is hosted in the internet. Imagine you upload (see ‘push’) into a repository that “lives” on a website. The advantage is that different people use this repository to download changes from and upload changes to. On GitHub you can store repositories for free.
Game: You put your save-game on a website. People can access this save-file by downloading it. Also people can add to the progress of the campaign (see next parts).
9. Origin
The origin is how your laptop calls a certain remote. It is nothing more than an alias. When you register a remote in your repository, git will alias it with ‘origin’ by default. You can register more than one with other names.
You can display your current remote with git remote -v; usually this will display a URL to a GitHub repository for example:c:\some\folder\cythonbuilder>git remote -v
origin https://github.com/mike-huls/cythonbuilder.git (fetch)
origin https://github.com/mike-huls/cythonbuilder.git (push)
As you can see above ‘origin’ is just an alias for the url. Git translates git push origin master to git push [githuburl] [branchname].
10. Cloning
If you clone a repository you download the entire repository to your laptop. git clone url_to_remote
11. Pull
When you pull code you sync the state of your local repository (on your laptop) with the remote. In other words: it downloads all changes that you don’t already have on your laptop. git pull
12. Push
This pushes changes you’ve made locally to the remote. This contains any branches you’ve made. git push
13. Pull request
Pull request: a pull request is nothing but a request to merge two branches. You can (and should) add reviewers who can check out your code and spot errors before merging. The nice thing is that if you fix the code in your branch, commit it and push it, the pull-request is automatically updated.
Eventually (hopefully) every reviewer will approve the pull request and we can merge the branch into the target-branch (e.g. the master branch)

Conclusion
I hope that I’ve shed some light on the wonderful tool called Git and all the amazing features it offers. If you have suggestions/clarifications please comment so I can make improvements. In the meantime, check out my other articles on all kinds of programming-related topics like these:
- Docker for absolute beginners
- Turn Your Code into a Real Program: Packaging, Running and Distributing Scripts using Docker
- Create a fast auto-documented, maintainable and easy-to-use Python API in 5 lines of code with FastAPI
- Why Python is slow and how to speed it up
- Advanced multi-tasking in Python: applying and benchmarking threadpools and processpools
- Getting started with Cython: how to perform >1.7 billion calculations per second in Python
- 5 real handy python decorators for analyzing/debugging your code
Happy coding!
— Mike
P.S: like what I’m doing? Follow me!


