How to Store and Query 100 Million Items Using Just 77MB with Python Bloom Filters
Perform lightning-fast, memory efficient membership checks in Python with this need-to-know data structure

A Bloom filter is a super-fast, memory-efficient data structure with many use-cases. The Bloom filter answers a simple question: does a set contain a given value? A good Bloom filter can contain 100 million items, use only 77MB of memory and still be lightning fast. It achieves this incredible efficiency by being probabilistic: when you ask if it contains an item, it can respond in two ways: definitely not or maybe yes.
A Bloom filter can either tell you with certainty that an item is not a member of a set, or that it probably is
In this article we’ll find out how a Bloom filter works, how to implement one, and we’ll go through some practical use cases. In the end you’ll have a new tool in your belt to optimize your scripts significantly! Let’s code!
Before we begin..
This article explores the mechanics of a Bloom Filter and provides a basic Python implementation to illustrate its inner workings in 6 steps:
- When to use a Bloom filter? Characteristics and use cases
- How does a Bloom filter work? a non-code explanation
- How do you add values and check for membership?
- How can I configure a Bloom filter?
- What role do hash functions play?
- Implementing a Bloom filter in Python.
The code resulting from this article is more educational than efficient. If you are looking for an optimized, memory-efficient and high-speed Bloom Filter check out bloomlib; a super-fast, easy-to-use Python package that offers a Bloom Filters, implemented in Rust. More info here.
pip install bloomlib1. When to use a Bloom filter?
Bloom filter are very useful in situations where speed and space are at a premium. This is very much the case in data science but also in other situations when dealing with big data. Imagine you have a dictionary application. Each time a user submits a word, we execute an expensive database query. Notice that this also happens when the user makes a typo e.g.
Adding 100 million strings only used 77MB of memory
In this case we can use a Bloom filter to severely limit the number of queries we have to execute by first checking if the word actually exists. Since our Bloom filter is very memory efficient we can simply add all words from the English dictionary. This way we can quickly check if a submitted word exist, avoiding the expensive database query if it doesn’t!
I’ve tested bloomlib by adding 100 million strings and found it only used 77MB of memory (5% false positive rate). By comparison, the Oxford Dictionary only contains 273,000 words (366x fewer).

Characteristics
Bloom filters have a unique combination of characteristics:
- Space & Memory Efficient: Bloom filters require much less space than other data structures like hash tables or sets.
- Super-fast: Adding new items or lookups are extremely fast, which is beneficial for performance-critical applications.
- Scalable: The filter handles large numbers of elements, making it ideal for big data applications.
- Portable: the filter can be serialized and saved. This way the state of the Bloom filter can be preserved over system re-boots or distributed.
Practical Use Cases
The Bloom filter’s unique combination of characteristics make them very convenient in many cases:
- Data Deduplication: They are used to identify unique items in massive datasets, helping in data cleaning processes by quickly filtering out duplicates, thus saving on processing time and storage.
- Big Data Processing: Hadoop, Apache Spark, and other big data frameworks use Bloom filters to optimize data processing.
- Database Queries: Helps in quickly querying whether a record exists in a database without actually querying the database.
- Cache Filtering: Before querying a slow cache, a Bloom filter can be used to check if the item is probably not in the cache, saving time.
- Spell Checkers: Used to quickly check if a word is in a dictionary.
- Network Applications: Used in network routers to quickly decide if a URL is in a list of malicious URLs.

2. How Does it Work?
A Bloom filter doesn’t store the whole object but a simpler representation. Think of it as not storing 3-dimensional objects but a photograph. We can store far more 2d photographs than 3d objects. The downside is that some information gets lost: “photographed” from the top, the silhouettes of a sky scraper and pyramid might look the same; a square.
In order to achieve the space efficiency, The Bloom filter simplifies objects by applying different hash functions to it and then store the results of these hash functions. It first takes a large array of bits that are all set to 0 initially. When adding an item to the filter, it is processed by multiple hash functions, each resulting in an integer that will serve as an index for our bit array. Bits at these indices are set to 1.
To check if an item is in the set, you run it through the same hash functions and see if all the bits at these positions are 1. If they are, there is a probability that the item is contained if not, it’s definitely not in the set. Later in this article we’ll take a closer look at how this works in a practical example.
False Positives and configuration
A false positive is when the Bloom Filter tells you that it may contain the item while it does not. In a probabilistic data structure like the bloom filter this can happen because different items can result in the same hashed values.
As we’ll see later on in this article, we can “set” the rate at which false positives occur by adjusting the length of the bit array and the number of times we hash a value. Increasing either will lower the chance of false positives but also have consequences for memory usage and speed.
3. Adding and getting values — Demo example
We’ll create a new Bloom filter by initializing a bit array. This simple example has 5 bits, all set to 0 initially:
[0 0 0 0 0]Adding a value
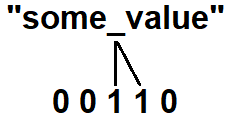
In order to add the string "some_value" to the filter, we need to apply a number of hash functions to it; in this example we’ll use two. Applying the first hash function to "some_value” results in the integer 3. We’ll use this as an index and set the corresponding bit in our bit array to 1.
Next we’ll apply the 2nd hash function to "some_value", resulting into 12. Since 12 is larger than the length of our bit array we’ll have to modulo it: 12 % 5 = 2, resulting in our index 2. We’ll use this to set the bit at index 2:
Adding a second value
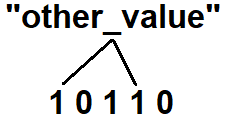
Let’s add a second item to our bit array: "other_value”. Applying the two hash functions results in indices 0 and 3. We only have to set the bit with index 0 since the bit with index 3 is already set:

Performing a lookup
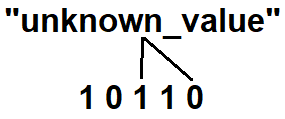
We want to check if "unknown_value” is contained in the Bloom filter. When we run it through the hash functions we’ll end up with indices 2 end 4. Not all bits at these indices are set to 1 so we know for sure that our Bloom filter doesn’t include "unknown_value”.
Collisions — False Positives
Next we’ll look up "a_new_value” in the Bloom filter. Running it through the hash functions gives us 22 and 23. After applying the modulo we end up with indices 2 and 3. Coincidentally, these are the exact same indices that "some_value” gave us.
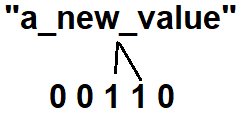
We must conclude that there is a a probability that "a_new_value” is contained in the Bloom filter. This is what makes the Bloom filter probabilistic.

4. Configuring my Bloom filter
When configuring your Bloom filter you want to aim to minimize the rate of false positives to a level that’s acceptable for our particular application. There are two ways you can calibrate your bloom filter:
- the length of the bit array (number of bits)
- the number of hash functions to use
Size of the bit array
More bits means more space to distribute the elements; when elements are hashed to a larger space, the chances that two different elements will have the same set of hashed positions decreases. The formula for determining the number of required bits looks like this:

The simple explanation of this formulat: given the desired fp-rate (ε) and the expected number of items (n), the required number of bits (m) are returned. In Python this formula is implemented as follows:
def optimal_memory_size(n:int, p:float) -> int:
    """ Return the required size of bit array(m)
        m = -(n * lg(p)) / (lg(2)^2)
    """
    m = -(n * math.log(p))/(math.log(2)**2)
    return int(m)
Number of hash functions to use
Increasing the number of hash functions results in more precision since it increases the number of bits to set for each element. On the other hand, using more hash functions also increases the chance of settings the same bits for different elements, especially if the bit fills up.

The formula above shows us how to find the optimal number of hash functions: given the size of the bit array (m) and the expected number of items (n) we find the required number of hash functions. In Python this is implemented as follows:
def optimal_n_hashes(self, m:int, n:int) -> int:
    """
    Return the number of required hash functions
        k = (m/n) * lg(2)
    """
    k = (m/n) * math.log(2)
    return int(k)
5. How to design the hash functions
Hashing is an important part of the Bloom filter. Applying the hash functions will translate our “complex” object to a “simple” one in the same way that “some_value” was translated to indices 3 and 4 in the previous chapter. Implementing hash functions can be very simple:
def hash_item(item: str, num_hashes:int) -> Iterable[int]:
    """ Hashes item, yields bit array indices """
    for i in range(num_hashes):
        yield hash(f"{item}{i}") % self.size
The code above works as follows: it loops through the range of the required number of hashes to apply. It then applies Python’s built-in hash function to the item item after suffixing the index of the num_hashes (i). You use the function like this:
for index in _hashes(item="my_value", num_hashes=6, bitarray_size=10_000):
    print("index: ", index)  # prints each index

# or

print([i for i in _hashes(item="my_value", num_hashes=6, bitarray_size=10_000)])
# "my_value" is hashed to 6 indices: [2473, 5047, 71, 9362, 8558, 9368]
Instead of suffixing the item with an index, you can also use 6 different kinds of hashing algorithms. Just take into account that the hash functions should be independent, uniformly distributed and as fast as possible. A great example is murmur.
6. Python implementation
Now that we know how to calculate the optimal number of bits and hashes, and we know how to hash, it’s time to implement our Bloom Filter.
Remember that this implementation is purely for understaning how a simplified Bloom Filter works and is far from optimal: it can only handle strings for example. If you are looking for the faster Python bloom filter package; check out BloomLib.
class BloomFilter:
    expected_number_of_items: int
    desired_fp_rate: float
    size: int
    num_hashes: int
    bit_array: list[int]

    def __init__(self, expected_number_of_items: int, desired_false_positive_rate: float) -> None:
        self.expected_number_of_items: int = expected_number_of_items
        self.desired_fp_rate: float = desired_false_positive_rate
        self.size: int = self._calculate_optimal_size(expected_number_of_items, desired_false_positive_rate)
        self.num_hashes: int = self._calculate_optimal_num_hashes(self.size, expected_number_of_items)
        self.bit_array: list[int] = [0] * self.size

    def _calculate_optimal_size(self, n: int, p: float) -> int:
        m = -(n * math.log(p)) / (math.log(2) ** 2)
        return int(m)

    def _calculate_optimal_num_hashes(self, m: int, n: int) -> int:
        k = (m / n) * math.log(2)
        return int(k)

    def hash_item(self, item: str) -> typing.Iterable[int]:
        """ Hashes item, yields bit array indices """
        for i in range(self.num_hashes):
            yield hash(f"{item}{i}") % self.size

    def add(self, item: str) -> None:
        """ Takes the outputs of the hash functions and sets the corresponding bits in the bit array """
        for hash_value in self.hash_item(item):
            self.bit_array[hash_value] = 1

    def contains(self, item: str) -> bool:
        """ Checks if all bit-indices from the hash functions are set to 1 in the bit array; only then the item may be contained """
        for hash_value in self.hash_item(item=item):
            if not self.bit_array[hash_value]:
                return False
        return True
The add and contains functions are new; they use the hash_item method and either set or check the resulting indices. We can see our bloom filter in action like this:
expected_number_of_items = 1000
desired_fp_rate = 0.05

bloom = BloomFilter(expected_number_of_items, desired_fp_rate)

# Add some values
bloom.add(item="apple")
bloom.add(item="banana")

# Lookup values
print("apple:", bloom.contains("apple"))    # Should return True
print("banana:", bloom.contains("banana"))  # Should return True
print("cherry:", bloom.contains("cherry"))  # Might return False, but can return True (false positive)
Conclusion
In this article we took a deep dive into Python object creation, learnt a lot about how and why it works. Then we looked at some practical examples that demonstrate that we can do a lot of interesting things with our newly acquired knowledge. Controlling object creation can enable you to create efficient classes and professionalize your code significantly.
To improve your code even further, I think the most important part is to truly understand your code, how Python works and apply the right data structures. For this, check out my other articles here or this this presentation.
I hope this article was as clear as I hope it to be but if this is not the case please let me know what I can do to clarify further. In the meantime, check out my other articles on all kinds of programming-related topics like these:
- Git for absolute beginners: understanding Git with the help of a video game
- Create and publish your own Python package
- Create a fast auto-documented, maintainable, and easy-to-use Python API in 5 lines of code with FastAPI
Happy coding!
— Mike
P.S: like what I’m doing? Follow me!


