Version control your database Part 2: migrations and seeds for table relations
Read this if you like beer, efficiency or modelling highly performing databases

In the previous part we’ve set up our migration tool, configured it, created some migrations and even seeded some data in our newly migrated tables. If you don’t know what I’m talking about, please check out this article. In this part we’ll focus on adding more functionalities to our tables. You can find the repository that we’ll build on in this article here. When you’ve read this part you’ll be able to:
- Migrate within a transaction
- Create associations between tables
- Set up columns with a type and constraints
- Seed data in your newly created database
- Impress others with your ability to set up a fully decked-out professional database, literally at the press of a button
0. Goals and preparation
Our goal is to create an database structure for a website called BeerSnob; a site that’s specially made for drinkers of fine beers. It allows users to share reviews about beers they drank at specific venues; rating both the venue and the beer while providing information about it’s price and taste. In order to achieve our goals we must have a database that can store information about the following:
- users (who is writing the review)
- beer (name, type)
- countries, cities and venues (the place where the beer is sold)
- reports: a User writing some information (like price, rating and a review) about a Beer at a Venue
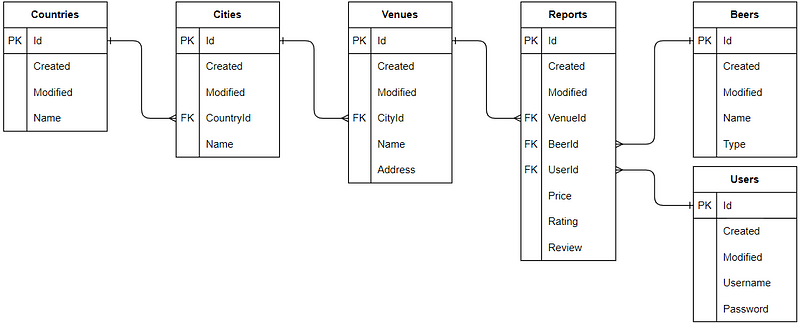
A report is the most import part of our design. Check out the overview below to capture these requirements in a nice database model:

As you see we split country, city and venue into separate tables which may be a bit overkill. We don’t really need it at the moment but maybe if I’ve learnt anything over the years, it’s that requirements seldom stay the same. In the future we’d like to add functionalities that might require a setup like this. Structuring our tables this way we assure flexibility for future developments.
Looking at this structure it seems that Report is the most important table; it specifies a Price, Rating and Review for a Beer at a Venue, given by a User. This is what users on the website will be looking for!
1. Setup
We’ll build further on the code we’ve written in the previous part. As you remember we’ve created 2 migrations:
- Create a schema called “app”
- Create a table called “countries” in the “app” schema
Pull the code from here if you want to code along.
2. Adding Users and Beers table
We’ll create Users and Beers in the same way that we’ve created the Countries table. In order to prevent this article from becoming too long I’ll skip the repetition. Check out the code in this repository.
3. Creating a migration for a table with a foreign key to another table
We’ve defined quite some tables already. Now lets get to linking tables together. First we’ll discuss why we should use a foreign key, then we’ll create a migration that implements one.

Why use a foreign key?
Foreign keys a columns in the child-table to a primary key in the parent-table. In our case we are going to connect the CountryId column in our City table to the Id column in our Country table. Foreign keys are really convenient for keeping your database clean and fast. They do so by preventing incorrect input (cannot input a city with a non-existent countryId). It also provides you with the ability to control what action will be taken when the referenced value in the parent table is updated or deleted. If a country is deleted, a foreign key can ensure that all the cities belonging to the deleted country get deleted as well.
Creating the migration
Let’s now get into creating a migation that links two tables together through a foreign key; the city table. First we’ll generate a new migration with npx sequelize-cli migration:create --name create_city. We will define the migration like below:
There are several interesting things going on in this code:
- We create CityId with references. We target the Id column in the tableModel_countries table we’ve defined in part 1. This creates a foreign key.
- We set some column default values (new Date() for Created and Modified). When you don’t pass a value it defaults to what is set here.
- We create come indices on the Id and Name column
- We do this all within a transaction. If, for example, adding an index fails, it also rolls back creating the table. This way we guarantee that either everything fails or everything succeeds. More info on transactions here.

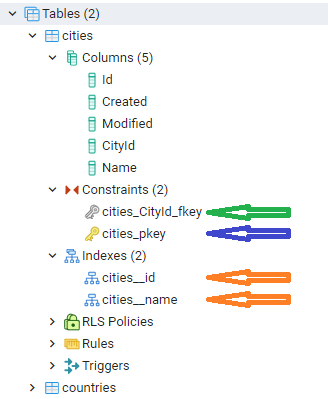
In this one migrations we’ve created the cities table with 5 columns, a primary key (blue arrow), a foreign key with the country table (green arrow) and two indices (orange arrows). Remember that the migration is database-independent; this is very powerful stuff!
4. Adding the Venues table
This is quite the same as with the Cities table. Check out the code in the repository for specifics.
5. Adding the Reports table
This is where everything comes together; we have to pay real attention here! We have to create a table with foreign keys to 3 other tables. Lets get into it:

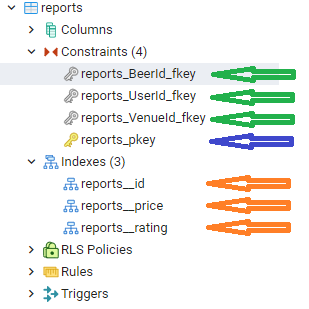
As you can see we’ve successfully created our tables with the green foreign keys, blue primary key and the orange indices.
6. Removing/adding a column
Migrations are not only important in setting up the table; they can also be used when the database in production. In BeerSnob we want to make a migration for removing the “Capital” column from the “countries” table. It is irrelevant. In the migration below we define how to do and undo just that:'use strict';
let tableModel = { schema: 'app', tableName: 'countries' };
module.exports = {
up: async (queryInterface, Sequelize) => {
await queryInterface.removeColumn(tableModel, 'Capital')
},
down: async (queryInterface, Sequelize) => {
await queryInterface.addColumn(tableModel, 'Capital', {
allowNull: true, type: Sequelize.STRING });
}
};
In the migration you see how the queryInterface removes and adds a column.
7. Using our model → seeding some data
Our tables are created, foreign keys are set, the indices are finished; our database model is created! Let’s insert some data so we can check if everything went as it should.

Handling user data
The user will send us a package containing one or more (or a lot if he had a good night) reports. Each report is linked to the users’ profile (Users table), to a specific record in the Beers table and to a Venue. In between the website and the database will be an API that will handle the data package. If the user Reports a Beer that does not exist yet then the API should first create a record in the Beers table and use the Id column of the newly created Beer while writing a record to Reports. In this article we’ll look into how the API manages to to this. Now we’ll just simulate it with seeds.
Inserting seed data
First we’ll insert a record for all of the tables. I won’t get into each seed in this article but you can check them out in the repository here. I’ll provide an example below of how I seeded Reports, our most import table. First run npx sequelize-cli seed:create --name seed_reports. The migration is coded as follows:
Pretty simple! The only difficult thing is get the right VenueId, BeerId and UserID but that’s the job of the API. Let’s not worry about it in this article.
Foreign keys in practice
Check out the app.reports table; you’ll see the three records we’ve defined in the seed file. Now image when a venue gets closed. We can’t have reports for non-existent venues! This is where the foreign keys come in. Remember that a record in the parent-table is linked to the dependent records in the child-table. Because we’ve deleted [onDelete: CASCADE], deleting a record in the Venues table causes a deletion of depending records in the reports table. Try it by executing DELETE FROM app.venues WHERE “Id” = 2;, then check out the reports table again!
Conclusion
In this article we’ve build on top of part1. We’ve upgraded it a lot with a set of perfectly linked tables with indices, primary keys, default values and other constraints. We’ve come a long way but more upgrades await. Check out this article to find out how we allow access to the database data by building an API that communicates with our database without having the need to write a single line of SQL! Follow me for more improvements.
— Mike
P.S. Check out the full project at https://github.com/mike-huls/beersnobv2
P.P.S: like what I’m doing? Follow me!


